# OverView
Bustub 的整体架构如下,之前的 p1 和 p2 实现的都是局部功能,p3 要求把前面的模块串起来,真正实现 SQL 执行的全过程。

课程中介绍的一条 SQL 语句的执行过程如下。
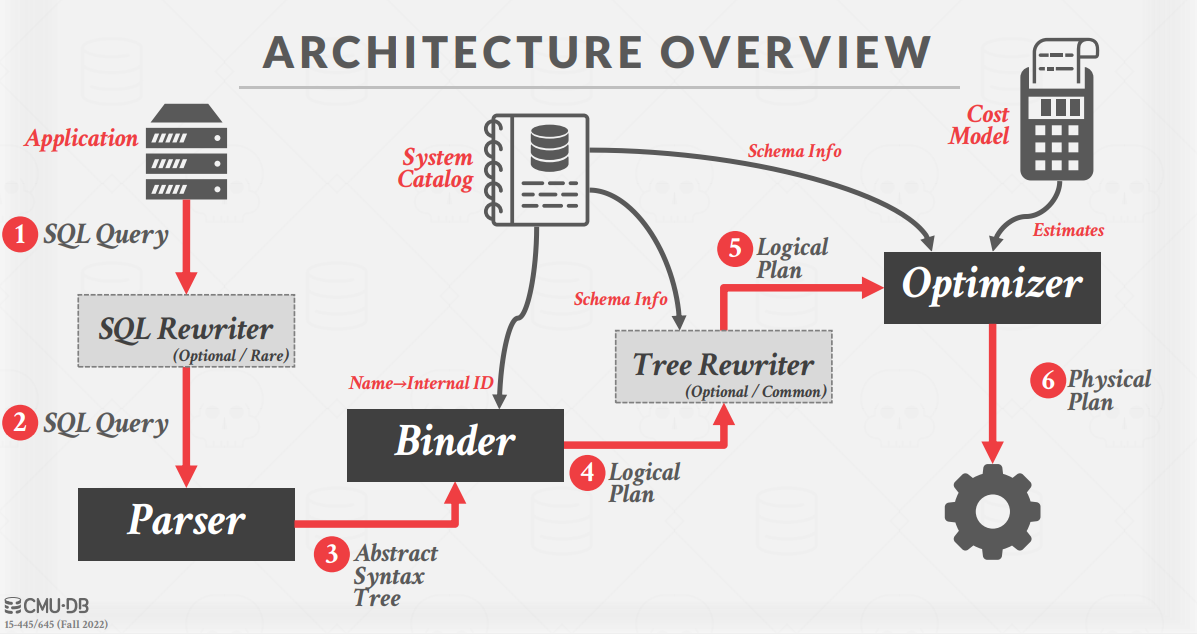
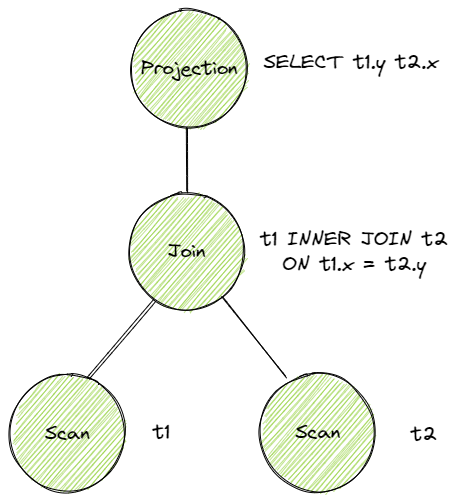
从语句生成语法树的过程这里不涉及,可以采用开源的工具实现。Binder 的作用是将 AST 的词语绑定到语法树上生成 Bustub 可以理解的树,Planner 会遍历生成的树产生执行计划树,例如这条 SQL。
SELECT t1.y, t2.x FROM t1 INNER JOIN t2 ON t1.x = t2.y; |
Optimizer 的作用是进行执行计划树的优化,实现方式主要有两种:
- Rule-based. Optimizer 遍历初步查询计划,根据已经定义好的一系列规则,对 PlanNode 进行一系列的修改、聚合等操作。例如我们在 Task 3 中将要实现的,将 Limit + Sort 合并为 TopN。这种 Optimizer 不需要知道数据的具体内容,仅是根据预先定义好的规则修改 Plan Node。
- Cost-based. 这种 Optimizer 首先需要读取数据,利用统计学模型来预测不同形式但结果等价的查询计划的 cost。最终选出 cost 最小的查询计划作为最终的查询计划。
最后进行的是 Executor,Bustub 采用的火山模型,从根结点开始不断从下层结点拉取数据。主要需要实现两个函数:Init () 和 Next ()。Init 函数时初始化计划 Node,并获取到要输出的第一个 Tuple,Nex 函数 t 则是不断获取下一个 Tuple 直到结束。
# Access Method Executors
先来看一下数据结构概览,这里参考了 eleven 的博客:

- Catalog:维护 hash map,保存从表 id 到表 info 的映射,并提供表级操作的 API
- TableInfo:包含 schema、id、name 信息和指向 table heap 的指针
- TableHeap:包含表的所有 page,以链表形式组织
- TablePage:包含 page 头信息,以及从页尾向前存储的数据 tuple 信息
- Tuple:数据元组,包含 rid 标识和数据 Value 指针
- Value:真实数据和对应的大小、类型信息
# SeqScan
只需要在类中加入一个迭代器,Init 和 Next 代码如下:
void SeqScanExecutor::Init() { | |
auto catalog = exec_ctx_->GetCatalog(); | |
auto table_info = catalog->GetTable(plan_->GetTableOid()); // 使用 plan_要查的表 id 在 catalog 中获取 | |
auto &table = table_info->table_; | |
iter_ = new TableIterator(table->MakeIterator()); | |
} | |
auto SeqScanExecutor::Next(Tuple *tuple, RID *rid) -> bool { | |
while (true) { | |
if (iter_->IsEnd()) { | |
delete iter_; | |
iter_ = nullptr; | |
return false; | |
} | |
if (iter_->GetTuple().first.is_deleted_) { // 已经被删除的不输出 | |
++(*iter_); | |
continue; | |
} | |
*tuple = iter_->GetTuple().second; | |
*rid = tuple->GetRid(); | |
break; | |
} | |
++(*iter_); | |
return true; | |
} |
# Insert
insert 返回值是有多少行被改变,因此在 Next 函数中需要有一个计数器。可以使用 InsertTuple () 和 InsertEntry () 函数实现 Tuple 插入和 index 更新,同时标记写操作。
auto InsertExecutor::Next([[maybe_unused]] Tuple *tuple, RID *rid) -> bool { | |
int nums = 0; | |
while (child_executor_->Next(tuple, rid)) { | |
TupleMeta tuple_meta = {INVALID_PAGE_ID, INVALID_TXN_ID, false}; | |
auto rid_optional = table_info_->table_->InsertTuple(tuple_meta, *tuple, exec_ctx_->GetLockManager(), | |
exec_ctx_->GetTransaction(), table_info_->oid_); | |
if (rid_optional.has_value()) { // 插入成功 | |
*rid = rid_optional.value(); | |
nums++; | |
// 记录写入信息 | |
TableWriteRecord{...}; | |
... .wtype_ = WType::INSERT; | |
exec_ctx_->GetTransaction()->GetWriteSet()->push_back(...); // 事务 | |
// 记录访问过的 index | |
for (auto &x : index_infos_) { | |
// tuple=keyfromtuple... | |
x->index_->InsertEntry(...); | |
// 记录写入信息 | |
IndexWriteRecord{...}; | |
exec_ctx_->GetTransaction()->GetIndexWriteSet()->push_back(...); | |
} | |
} | |
} | |
std::vector<Value> values{}; | |
values.emplace_back(INTEGER, nums); // 返回改变的行数 | |
*tuple = Tuple(values, &GetOutputSchema()); | |
return true; | |
} |
# Update
使用提供的 UpdateTupleInPlaceUnsafe () 函数,对于索引采用先 delete 对应 tuple 再插入新 tuple 的形式,每个 Next () 要更新两次索引。
# Delete
与 Insertt 非常相似。
# IndexScan
将 plan 中的 index 安全转换为 BPlusTreeIndexForTwoIntegerColumn
auto b_plus_tree_index = dynamic_cast<BPlusTreeIndexForTwoIntegerColumn *>(index_info->index_.get()); |
Init () 中使用转换好的索引获取起始迭代器,在 Next () 输出。
# Aggregation & Join Executors
# Aggregation
主要用于 group by 字段和 count ()/count (*)/Max/Min/Sum 函数。
Note: The aggregation executor itself won’t need to handle the HAVING predicate. The planner will plan aggregations with a HAVING clause as an AggregationPlanNode followed by a FilterPlanNode .
也就是说 having 条件是不用处理的,会作为 Filter 算子看待。
需要注意的是聚合函数必须在 Init () 中就取得所有结果,在 Next () 中只负责输出。
AggregationExecutor 有如下几个成员:
/** The aggregation plan node */ | |
const AggregationPlanNode *plan_; | |
/** The child executor that produces tuples over which the aggregation is computed */ | |
std::unique_ptr<AbstractExecutor> child_executor_; | |
/** Simple aggregation hash table */ | |
SimpleAggregationHashTable aht_; | |
/** Simple aggregation hash table iterator */ | |
SimpleAggregationHashTable::Iterator aht_iterator_; |
其中 SimpleAggregationHashTable 维护一张 hash map,保存 AggregateKey(group by 字段)到 AggregateValue(需要聚合的字段)的映射。对于每个 Tuple,InsertCombine () 可以将上述字段存入或更新哈希表。
例如:
SELECT min(t.z), max(t.z), sum(t.z) FROM t GROUP BY t.x, t.y; |
AggregateKey:
AggregateValue:
AggregateType:
具体 combine 方法上:
switch (agg_types_[i]) { | |
case AggregationType::CountStarAggregate: //count (*) 计入空值 | |
result->aggregates_[i] = result->aggregates_[i].Add(ValueFactory::GetIntegerValue(1)); | |
break; | |
case AggregationType::CountAggregate: | |
if (!input.aggregates_[i].IsNull()) { | |
if (result->aggregates_[i].IsNull()) { // 排除空值 | |
result->aggregates_[i] = ValueFactory::GetIntegerValue(0); | |
} | |
result->aggregates_[i] = result->aggregates_[i].Add(ValueFactory::GetIntegerValue(1)); | |
} | |
break; | |
case AggregationType::SumAggregate: | |
if (!input.aggregates_[i].IsNull()) { | |
if (result->aggregates_[i].IsNull()) { | |
result->aggregates_[i] = input.aggregates_[i]; | |
} else { | |
result->aggregates_[i] = result->aggregates_[i].Add(input.aggregates_[i]); | |
} | |
} | |
break; | |
case AggregationType::MinAggregate: | |
//... | |
case AggregationType::MaxAggregate: | |
//... | |
} |
# NestedLoopJoin
循环嵌套连接时将两个表暴力匹配的过程。。。
判断是否匹配可以使用 plan_->Predicate ()->EvaluateJoin ()。
每次固定左表向前 1 步,右表遍历一遍。每次右表要重新开始,因为没有索引无法判断相对位置,并且可能有一对多的情况。
auto NestedLoopJoinExecutor::Next(Tuple *tuple, RID *rid) -> bool { | |
while (true) { | |
while (right_executor_->Next(right_tuple_, rid)) { | |
// 检查是否匹配 | |
auto value = plan_->Predicate()->EvaluateJoin(left_tuple_, plan_->GetLeftPlan()->OutputSchema(), right_tuple_, | |
plan_->GetRightPlan()->OutputSchema()); | |
if (!value.IsNull() && value.GetAs<bool>()) { | |
// 构造 tuple... | |
return true; | |
} | |
} | |
// 左连接需要输出 null 信息 | |
if (!match_ && plan_->GetJoinType() == JoinType::LEFT) { | |
// 构造 tuple... | |
right_executor_->Init(); | |
return true; | |
} | |
// 左表遍历完 | |
if (!left_executor_->Next(left_tuple_, rid)) { | |
delete left_tuple_; | |
left_tuple_ = nullptr; | |
delete right_tuple_; | |
right_tuple_ = nullptr; | |
return false; | |
} | |
right_executor_->Init(); // 无索引的嵌套循环匹配,右表需要从头开始 | |
match_ = false; | |
} | |
return true; | |
} |
# NestedIndex Join
如果外表有索引,则可以直接根据索引快速找到数据。现在左表中获取连接操作的谓词相匹配的 value,再用这个 value 构造右表中的 tuple key,用这个 key 去右表索引里找。
// 在左表中获取用于右表匹配的 key | |
auto value = plan_->KeyPredicate()->Evaluate(&left_tuple_, left_executor_->GetOutputSchema()); | |
std::vector<Value> values; | |
values.push_back(value); | |
Tuple right_key_tuple = Tuple(values, index_info_->index_->GetKeySchema()); | |
// 在索引中找匹配的 | |
std::vector<RID> result; | |
index_info_->index_->ScanKey(right_key_tuple, &result, exec_ctx_->GetTransaction()); |
# HashJoin
hash join 可以快速地完成等值连接操作。
可以通过表达式将连接的 key 获取出来,使用工具类 HashUtil 哈希后存入哈希表。然后遍历另一张表,从连接表达式中获取 join key 并判断是否在哈希表中存在,若存在就将哈希表中对应的 key 也获取出来进行比较(因为可能有哈希冲突)。
void HashJoinExecutor::Init() { | |
// 右表哈希保存 | |
auto expresses = plan_->RightJoinKeyExpressions(); | |
while (right_executor_->Next(&tmp_tuple, &rid)) { | |
for (auto const &express : expresses) { | |
auto join_key = express->Evaluate(&tmp_tuple, plan_->GetRightPlan()->OutputSchema()); | |
hash_join_table_[HashUtil::HashValue(&join_key)].push_back(tmp_tuple); | |
} | |
} | |
// 遍历左表 Tuple | |
while (left_executor_->Next(&tmp_tuple, &rid)) { | |
auto left_expressions = plan_->LeftJoinKeyExpressions(); | |
for (auto const &left_express : left_expressions) { | |
// 获取左 key | |
auto join_key = left_express->Evaluate(&tmp_tuple, plan_->GetLeftPlan()->OutputSchema()); | |
// 在哈希表中有右 key | |
if (hash_join_table_.count(HashUtil::HashValue(&join_key)) > 0) { | |
auto right_tuples = hash_join_table_[HashUtil::HashValue(&join_key)]; | |
// 可能有哈希冲突,保存的是 vector | |
for (const auto &tuple : right_tuples) { | |
auto right_expressions = plan_->RightJoinKeyExpressions(); | |
for (auto const &right_express : right_expressions) { | |
auto right_join_key = right_express->Evaluate(&tuple, plan_->GetRightPlan()->OutputSchema()); | |
if (right_join_key.CompareEquals(join_key) == CmpBool::CmpTrue) { | |
std::vector<Value> values{}; | |
values.reserve(plan_->GetLeftPlan()->OutputSchema().GetColumnCount() + | |
plan_->GetRightPlan()->OutputSchema().GetColumnCount()); | |
// 构造输出列 | |
for (uint32_t col_idx = 0; col_idx < plan_->GetLeftPlan()->OutputSchema().GetColumnCount(); col_idx++) { | |
values.push_back(tmp_tuple.GetValue(&plan_->GetLeftPlan()->OutputSchema(), col_idx)); | |
} | |
for (uint32_t col_idx = 0; col_idx < plan_->GetRightPlan()->OutputSchema().GetColumnCount(); col_idx++) { | |
values.push_back(tuple.GetValue(&plan_->GetRightPlan()->OutputSchema(), col_idx)); | |
} | |
output_tuples_.emplace_back(values, &GetOutputSchema()); | |
} | |
} | |
} | |
} else if (plan_->GetJoinType() == JoinType::LEFT) { | |
std::vector<Value> values{}; | |
values.reserve(plan_->GetLeftPlan()->OutputSchema().GetColumnCount() + | |
plan_->GetRightPlan()->OutputSchema().GetColumnCount()); | |
for (uint32_t col_idx = 0; col_idx < plan_->GetLeftPlan()->OutputSchema().GetColumnCount(); col_idx++) { | |
values.push_back(tmp_tuple.GetValue(&plan_->GetLeftPlan()->OutputSchema(), col_idx)); | |
} | |
for (uint32_t col_idx = 0; col_idx < plan_->GetRightPlan()->OutputSchema().GetColumnCount(); col_idx++) { | |
values.push_back( | |
ValueFactory::GetNullValueByType(plan_->GetRightPlan()->OutputSchema().GetColumn(col_idx).GetType())); | |
} | |
output_tuples_.emplace_back(values, &GetOutputSchema()); | |
} | |
} | |
} | |
//... | |
} |
# Optimizing NestedLoopJoin to HashJoin
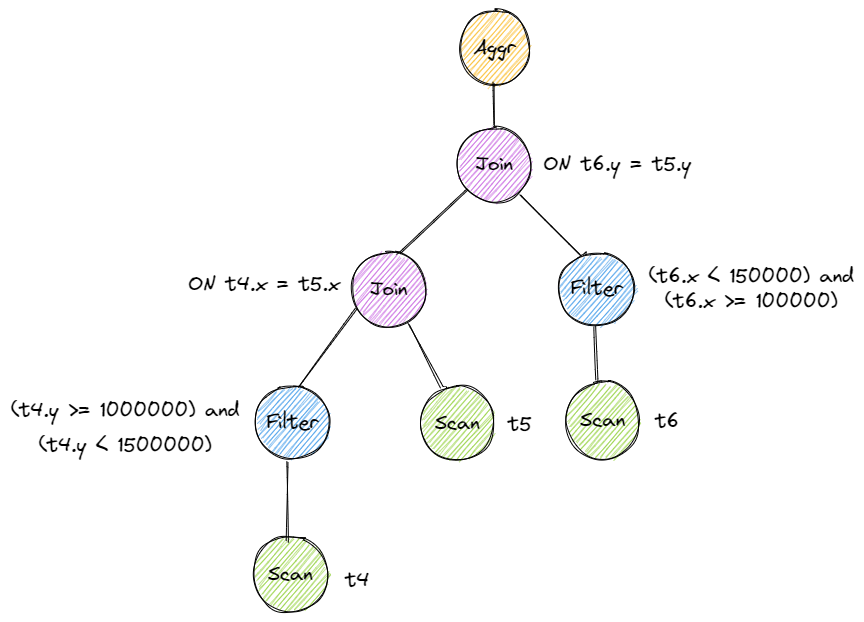
将循环嵌套连接优化为哈希连接。
总体思路:从根结点开始,若当前结点为循环嵌套 Node 则提取表达式中的过滤谓词、常量等并保存,然后递归优化左右子结点;若为 scan 结点则说明到叶结点,将过滤词拼接成一个结点,最后将当前结点所有子结点替换为哈希连接结点。拼接时重新构造一棵子树并替换原有结点。过滤时需要将常量传递下去拼接并尽量早过滤,将比较变量区分源于哪张表并 push down 到对应左右表的父节点为止。
下面两张图展示了优化前后的树。

# Sort + Limit Executors and Top-N Optimization
# Sort
先获取所有 tuple 然后排序一下就行。
while (child_executor_->Next(&tuple, &rid)) { | |
tuples_.push_back(tuple); | |
} | |
auto order_bys = plan_->GetOrderBy(); | |
std::sort(tuples_.begin(), tuples_.end(), [&](const Tuple &a, const Tuple &b) { | |
for (auto [order_by_type, expr] : order_bys) { | |
auto a_val = expr->Evaluate(&a, plan_->GetChildPlan()->OutputSchema()); | |
auto b_val = expr->Evaluate(&b, plan_->GetChildPlan()->OutputSchema()); | |
if (a_val.CompareLessThan(b_val) == CmpBool::CmpTrue) { | |
return order_by_type == OrderByType::ASC || order_by_type == OrderByType::DEFAULT; | |
} | |
if (a_val.CompareGreaterThan(b_val) == CmpBool::CmpTrue) { | |
return order_by_type == OrderByType::DESC; | |
} | |
} | |
return true; | |
}); |
# Limit
只要用一个计数器保存输出到第几个,超过 limit 就不输出了。
# Top-N Optimization Rule
自定义一个堆,如果是升序就用大根堆,降序就用小根堆。目标值存在堆底,如果堆 size 大于 N 则将堆顶弹出。因为要输出的数存在堆底,需要使用一个 vector 保存一下,逆序输出。
auto cmp = [&](const Tuple &a, const Tuple &b) { | |
for (auto [order_by_type, expr] : order_bys) { | |
auto a_val = expr->Evaluate(&a, plan_->GetChildPlan()->OutputSchema()); | |
auto b_val = expr->Evaluate(&b, plan_->GetChildPlan()->OutputSchema()); | |
if (a_val.CompareLessThan(b_val) == CmpBool::CmpTrue) { | |
//a<b 返回 true, 取前 k 小使用大根堆 | |
return order_by_type == OrderByType::ASC || order_by_type == OrderByType::DEFAULT; | |
} | |
if (a_val.CompareGreaterThan(b_val) == CmpBool::CmpTrue) { | |
//a>b 返回 true, 取前 k 大使用小根堆 | |
return order_by_type == OrderByType::DESC; | |
} | |
} | |
return true; | |
}; | |
std::priority_queue<Tuple, std::vector<Tuple>, decltype(cmp)> heap(cmp); | |
heap_size_ = 0; | |
Tuple tuple; | |
RID rid; | |
while (child_executor_->Next(&tuple, &rid)) { | |
// 入堆... | |
if (heap_size_ > plan_->GetN()) { // 删除多余 N 的 | |
// 弹出堆顶... | |
} | |
} | |
// 此时剩余的是结果,弹出序的逆序 | |
while (!heap.empty()) { | |
// 加入 vector 并弹出堆顶 | |
} |
# Test
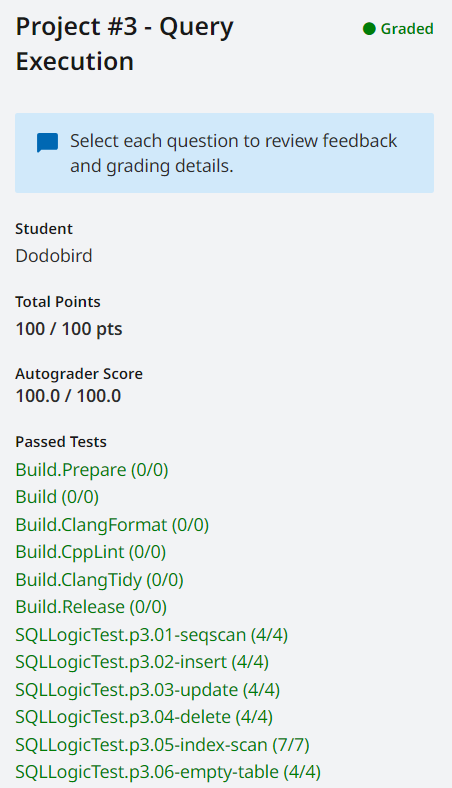
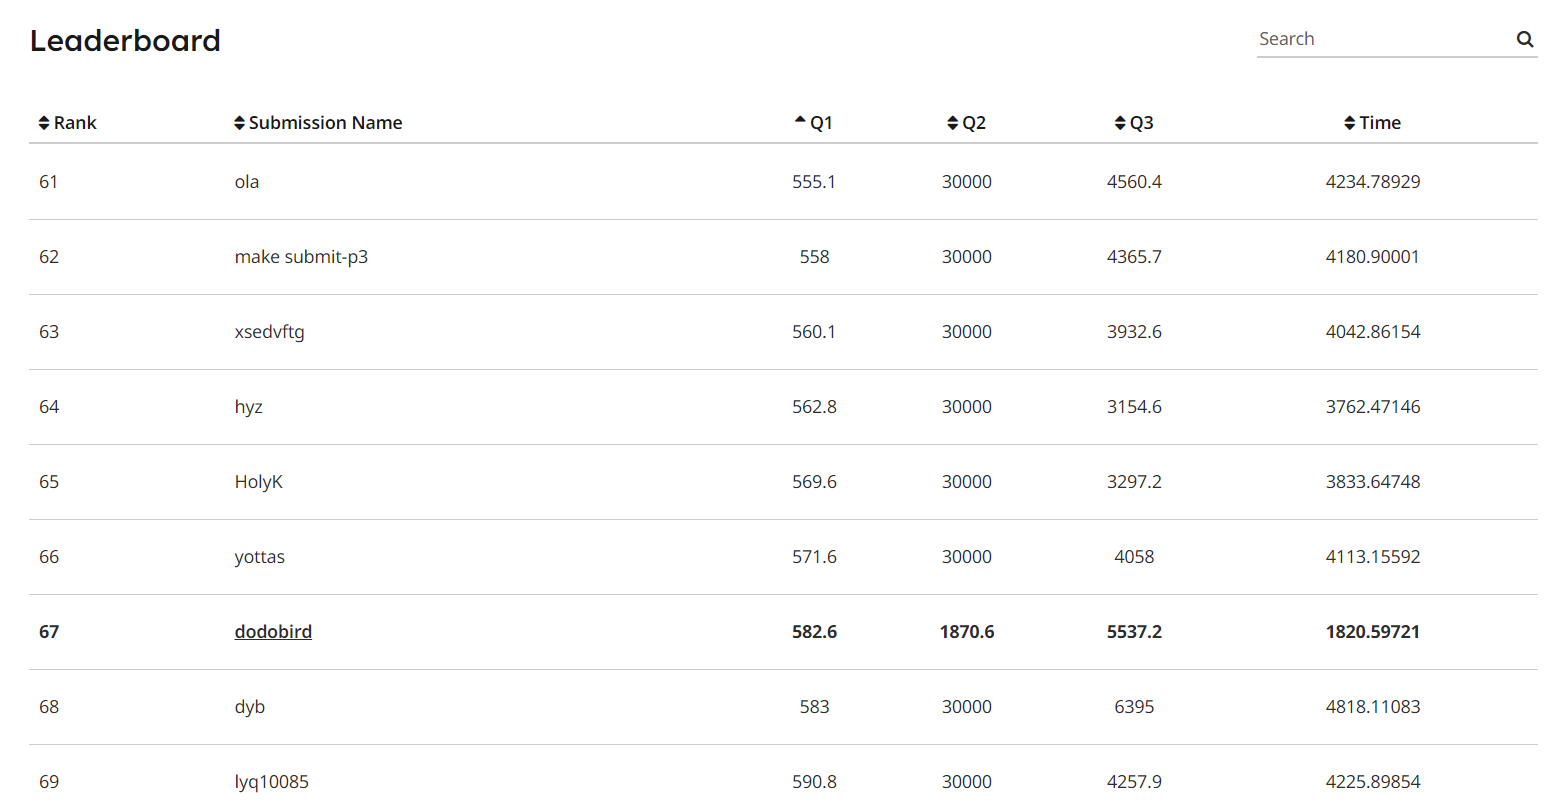
测试程序已跑通